
Creating lifelike 3D models for films and games demands precision and artistry. For aspiring artists and seasoned professionals alike, understanding anatomy forms the cornerstone of accurate creature modeling. This article explores how to approach hippo anatomy, focusing on the hippo skull and muscles, for realistic and efficient 3D sculpting.
Why Understanding Anatomy is Crucial in 3D Modeling
Crafting realistic 3D characters goes beyond surface details. Starting with underlying anatomy, such as bones and muscles, ensures accuracy and enhances your final output. For example, the hippo skull serves as a structural base for building authentic muscle and skin layers.
During the modeling process, simplifying complex anatomical structures helps focus on their function, which saves time and boosts efficiency.
The Hippo Anatomy Study Project
This project stemmed from a workshop titled “Creature Modeling – From Biology to CG” led by Gael Kerchenbaum at the Animationsinstitut of Filmakademie Baden-Württemberg. The four-day workshop provided invaluable insights into translating biological forms into digital models.
The project’s goal was to create an écorché of a hippo, beginning with the hippo skull and progressing through muscles to a fully realized creature. This step-by-step approach demystifies anatomical modeling, making it manageable for anyone willing to put in the effort.
Key Tools and Software for 3D Modeling
Here’s a breakdown of the essential tools used for the project:
- PureRef: For organizing references.
- ZBrush and ZWrap: Sculpting and wrapping textures onto models.
- Maya and Arnold: Rendering and rigging.
- Advanced Skeleton and Ziva Dynamics: Creating realistic muscle and skeleton simulations.
- Substance 3D Painter and Mari: Texturing tools for high-quality finishes.
- Photoshop: Enhancing textures and final render adjustments.
These tools streamline the creation of detailed anatomy, such as the intricate structure of a hippo skull, ensuring a professional result.
Step-by-Step Process: From Hippo Skull to Muscle Sculpting

1. Start with the Hippo Skull
The hippo skull forms the foundation of the model. Begin by studying real-world references and anatomical diagrams. PureRef is invaluable for keeping images organized. Simplify the structure into basic shapes to understand its key features and proportions.
2. Build the Muscle Layers
Once the hippo skull is modeled, layer the muscles using ZBrush. Focus on functionality—how muscles attach and interact with the bones. Ziva Dynamics aids in simulating realistic muscle movements, adding life to your model.
3. Add Skin and Texture
After completing the bone and muscle layers, apply skin and textures. Tools like Substance Painter and Mari help create lifelike textures that replicate the hippo’s natural appearance. Ensure lighting and shading in Arnold highlight these details.
Tips for Successful Creature Modeling
Simplify Complex Structures
Break down intricate anatomical details, like the hippo skull, into manageable sections. This approach helps maintain focus and clarity throughout the process.
Leverage Quality References
Accurate references are crucial. Use multiple angles of the hippo skull and muscle diagrams to guide your work.
Experiment with Tools
Explore different software features to discover workflows that suit your style. ZWrap, for instance, simplifies mapping textures onto complex models.
Hippo Skull Sculpting: A Comprehensive Guide to Setting Up Your Project
Crafting realistic 3D models of mammals, like a hippo, requires detailed planning and execution. The skull, being a focal point of anatomical accuracy, plays a critical role in the success of the entire project. This guide outlines how to set up your project, sculpt the hippo skull, and build the foundation for a stunning 3D creation.
Choosing the Right Subject: Starting Your Project
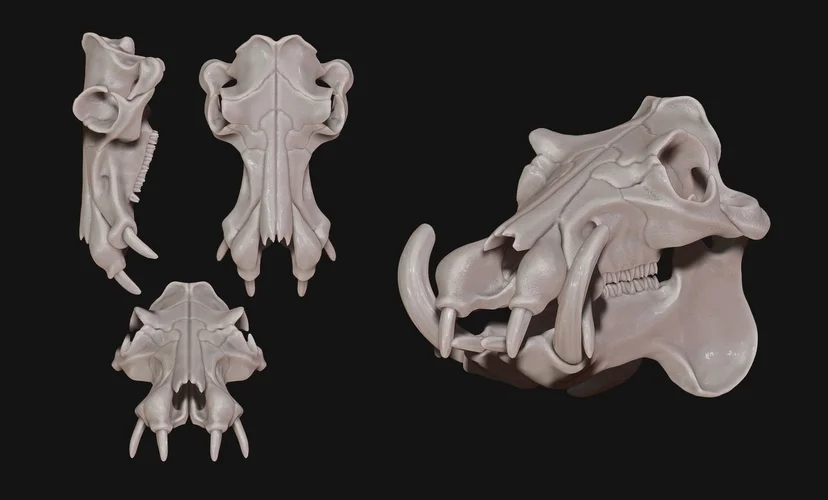
At the onset of the workshop, the task was to select a mammal to sculpt. Opting for the hippo was a decision I never regretted. Its hippo skull is both striking and unique, contrasting sharply with its soft, rounded face.
To kickstart the process, gathering high-quality references is essential. For the hippo skull and muscles, I collected images in various categories to assist during different sculpting phases. Finding anatomical references for hippos proved challenging due to limited availability. However, Jun Huang’s exceptional Écorché became my primary reference, providing much-needed clarity.
Tip for Beginners
Stick to real-world references whenever possible. Analyzing gray renders of other models can offer additional insights, but always prioritize the quality of references over quantity for better accuracy.
Sculpting the Hippo Skull: Step-by-Step Guide
The first day of the workshop focused on selecting a mammal, gathering references, and sculpting the skull. The hippo skull served as the foundation, helping establish key anatomical landmarks. The following method ensured an efficient workflow:
1. Blocking the Shape
- Begin with a primitive shape, such as a cube, sphere, or cylinder.
- Focus on roughing out the silhouette and maintaining proper proportions.
- Keep the model low-poly initially to avoid unnecessary surface details.
2. Refining with Dynamesh
- Use Dynamesh to add resolution where necessary.
- To create holes or remove unnecessary areas, use the IMM brush while holding Alt. Reapply Dynamesh to clean up the mesh.
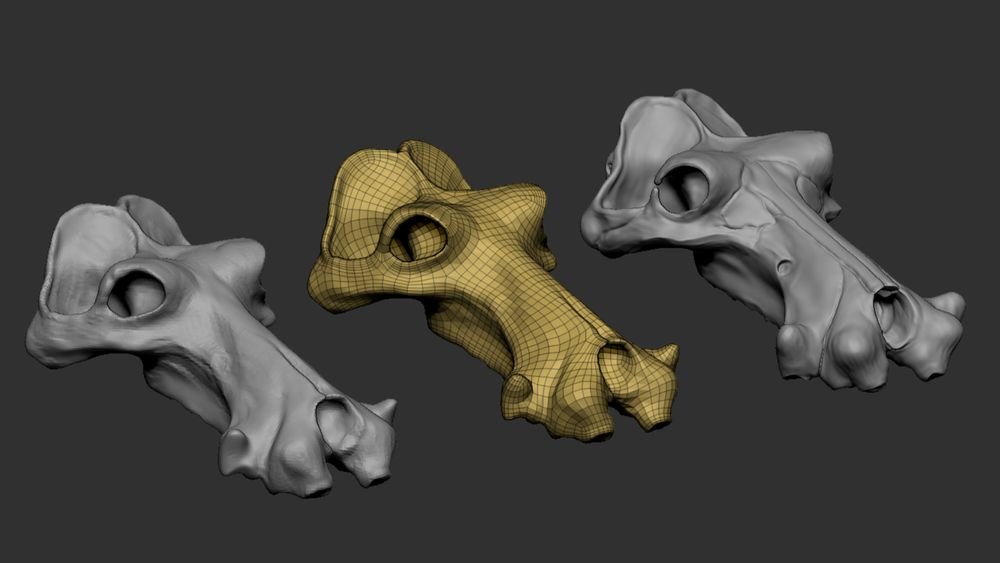
3. Using ZRemesher for Clean Topology
- Once the main shape is in place, apply ZRemesher to create a clean topology.
- Use subdivision levels early to refine the surface and make it rig-ready.
- ZRemesh whenever needed to maintain smooth transitions and workable topology.
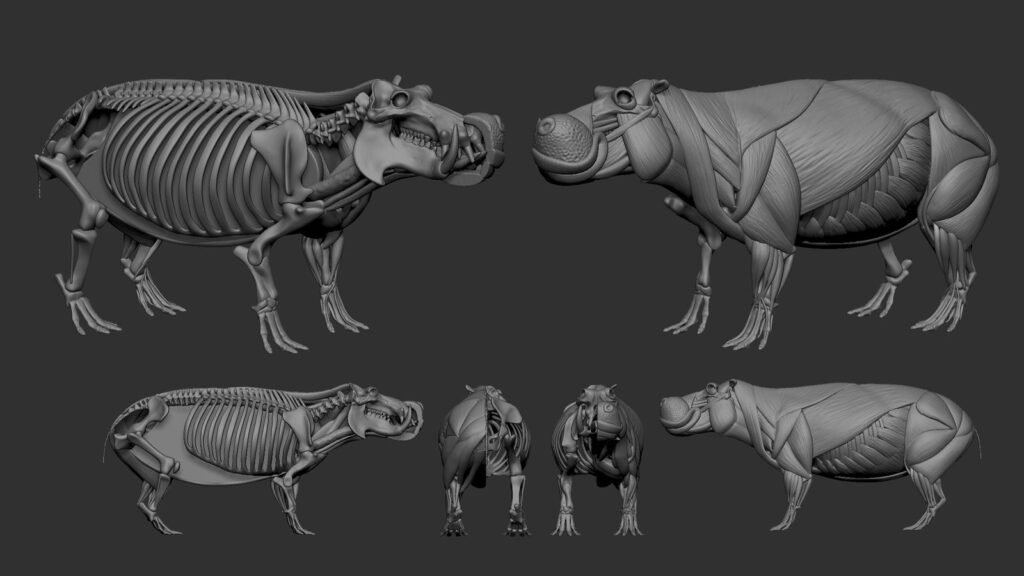
Completing the Skeleton
After finishing the hippo skull, the next step involved sculpting the remaining skeleton. Understanding joint types and their combinations proved essential during this phase.
Key Considerations for Bone Sculpting
- Functionality First: Analyzing how each bone functions simplifies the sculpting process.
- Core Shapes: Breaking down bones into their core shapes prevents over-detailing and helps in muscle placement later.
- Range of Motion: Exaggerating joints during the sculpting process aids in rigging and ensures optimal movement simulations.
Benefits of Simplification
Simplifying the bones early on speeds up workflow, allowing for smoother transitions to muscle sculpting. The functional approach also ensures that the skeleton aligns seamlessly with rigging and animation requirements.
Challenges and Insights
Sculpting the hippo skull required balancing anatomical accuracy with artistic interpretation. By focusing on the primary features and ignoring unnecessary details, the process became more manageable. Additionally, thinking ahead about the skeleton’s role in rigging helped streamline the project.
Gathering references for specific mammals, like hippos, remains a significant challenge. However, investing time in finding the right resources pays off in the quality of the final model.
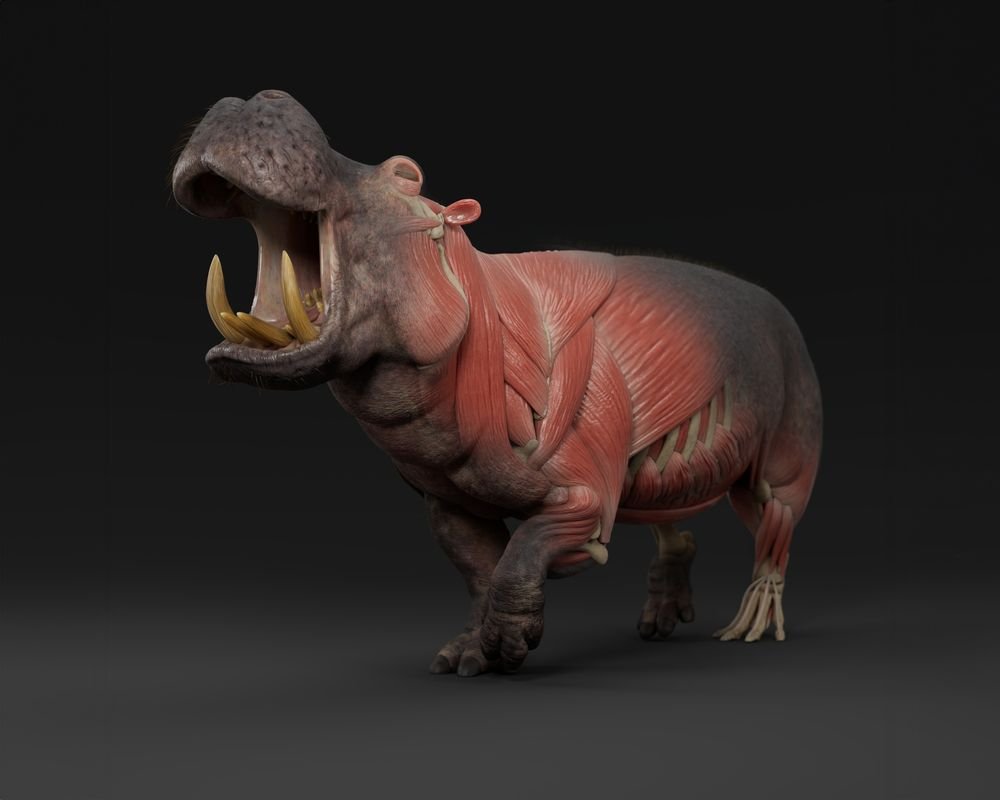
Mastering Muscle Sculpting: From the Hippo Skull to Realistic 3D Models
Sculpting muscles for a 3D model can be a daunting task, especially when working with complex creatures like a hippo. However, with the right resources and techniques, you can effectively build realistic muscle structures. This article guides you through the muscle sculpting process, from understanding anatomy to refining your hippo skull model.
Starting the Sculpting Process: Muscle Structure Overview
The second day of the workshop focused on sculpting muscles, and I was initially overwhelmed by the complexity. However, Gael, the instructor, reassured me by explaining that mammals share similar bones and muscles. This made my job easier since I could apply my basic knowledge of human anatomy.
Gael also provided key resources that helped me understand animal anatomy in greater detail. These included:
- An Atlas of Animal Anatomy for Artists
- Animal Anatomy for Artists: The Elements of Form by Eliot Goldfinger
- Atlas of Topographical Anatomy of the Domestic Animals by Peter Popesko
- • An Artist’s Atlas of Animal Anatomy by W.. Ellenberger, H. Dittrich, and H. Baum
These books are the foundation for understanding animal anatomy and are available online for free. For my hippo skull and muscles, I found the first book particularly useful because of its detailed muscle descriptions.
Sculpting the Muscles: Step-by-Step Process
1. Blocking Out the Muscle Shapes
I started by following the same workflow used for sculpting the hippo skull. Using references from the books, I blocked out the general shapes of the muscles. Mammals share a similar muscle structure, so I adapted references from animals like dogs, horses, and cows to fit the hippo model.
2. Fine-Tuning Muscle Volume
Achieving the right volume for each muscle was a challenge. It required frequent adjustments and a keen eye for proportion. Returning to my reference board allowed me to tweak the shapes and ensure that the muscles looked accurate.
To speed up this process, I duplicated existing muscle shapes and modified them, rather than starting from scratch every time. This approach saved time and helped maintain consistency across the model.
3. Adding Details and Refining the Silhouette
Once the basic muscle shapes were in place, I focused on refining the silhouette of the hippo skull and muscles. This step involved adding details like creases and folds between the muscles, which brought the model closer to a realistic appearance.
Merging and Creating the Skin Layer
On the final day of the workshop, we merged the muscles into a single subtool and dynameshed them to create a watertight mesh. This step was crucial for ensuring that the muscles formed a seamless surface for the skin to sit on. I worked on the head and feet separately to accommodate more manual adjustments in these areas.
After merging the muscles, I began adding separate fat and skin volumes, which made the muscles less visible. Since hippos are not particularly lean, the skin layer helped provide the necessary realism.
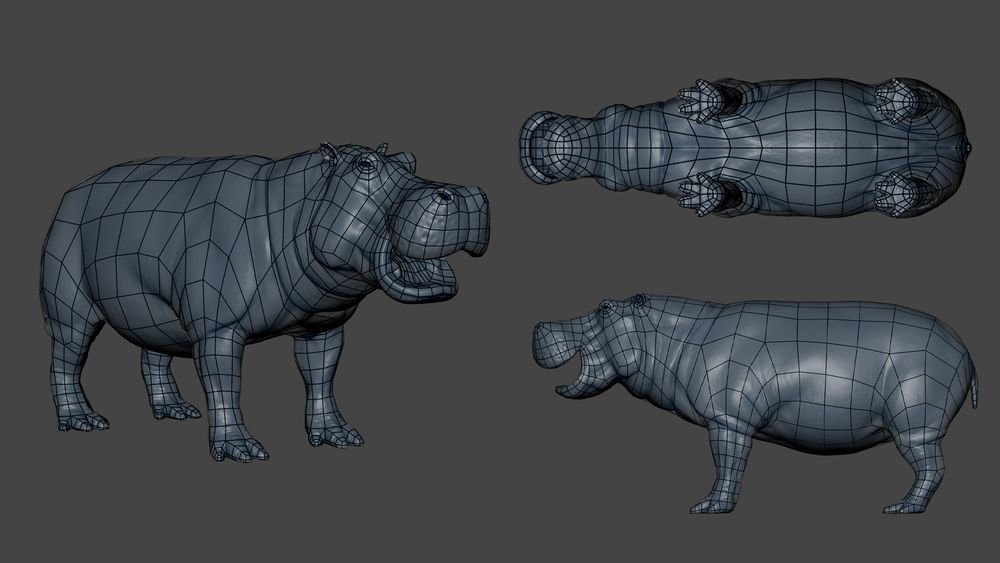
Retopology: Preparing the Model for Rigging
Once I had a solid base for the hippo skull and muscles, I moved on to the retopology phase. Using Maya, I manually retopologized the mesh to keep it as simple and low-poly as possible. This step was vital for ensuring that the higher subdivision levels would have a clean topology, which is essential for rigging and simulations.
Retopologizing also improves weight painting, making the skin deformation more natural during animations.
Rigging the Hippo: Making the Model Animatable
The rigging process took place in Maya using Advanced Skeleton, an auto-rigging tool that supports quadrupeds and humanoid models. For the hippo skull and body, I customized the rig to fit the unique features of the hippo.
Using Advanced Skeleton’s facial rigging system, I adapted the setup for the hippo’s face, despite the tool being designed primarily for humanoid models. The joints were placed based on the skeletal structure of the hippo, with special attention to the spine, which required more central joint placement.
After weight painting the skin, I copied the weights onto the zremeshed muscles. To improve deformation, I used ZWrap to wrap the skin mesh onto the dynameshed muscle mesh. This ensured that the muscles moved naturally with the skin, completing the rigging process.
Mastering Muscle Simulation for Realistic 3D Hippo Models: From Skull to Skin
When creating a 3D hippo model, muscle simulation is a crucial step that brings realism to your character’s movements. In this guide, I will walk you through the process of muscle simulation, animation, texturing, and shading, focusing on the hippo skull and overall muscle dynamics.
Muscle Simulation: Creating Realistic Movement
For muscle simulation, I used Ziva Dynamics, a tool that unfortunately will soon be discontinued. I employed a simplified setup developed by Andy van Straten, which has proven effective in the past. This setup combines the entire body into one muscle to simulate more of a “jiggle” effect, allowing for realistic muscle movement.
To begin, I based the bone mesh on the hippo skull and the existing skeleton structure. Afterward, I wrapped the muscles to the skin mesh to enhance the natural jiggle effect when the model moves. This process contributed significantly to creating lifelike muscle dynamics, making the hippo’s movements more believable.
Animating the Hippo: Walk and Run Cycle
Animating the hippo was one of the most exciting stages of the project. My goal was to create a smooth walk-and-run cycle, but first, I spent a considerable amount of time gathering reference clips. I was fortunate to find high-quality videos that showcased the movement from various angles, which helped me accurately capture the hippo’s motion.
For animation, I applied a technique that I learned from Martin L’Heureux. This method involves working primarily in the graph editor, adjusting simple curves, and offsetting them to create different motions. This workflow significantly sped up the process of creating animation cycles. While explaining this technique in detail would require a separate article, it was essential for producing fluid and realistic movements for the hippo skull and the rest of the body.
Texturing and Shading the Hippo Model
Texturing is often a challenging part of the process, and I admit I tend to delay it as much as possible. For this project, I decided to push myself and use Mari for the first time. Thanks to Gael Kerchenbaum’s previous workshop on texturing and look development in Mari, I was able to follow his professional workflow.
To add fine micro details to the model, I projected Texturing XYZ displacement maps onto the hippo skull and the muscles. I used Substance Painter and ZBrush to bake utility maps and isolation maps (ISOs), ensuring a high level of detail across the entire model.
The first attempt at texturing resulted in a flat appearance, so I went back and revised the textures, making sure the final version was more dynamic and realistic. The skeleton and muscles were textured using Substance 3D Painter, where I utilized auto UVs and smart materials to streamline the process.
In terms of shading, Gael’s first workshop on shading in Arnold had a significant influence. He taught me how to adjust the separate displacement channels from Texturing XYZ and fine-tune the roughness and coat settings. This shading technique enhanced the realism of the hippo skull and gave the skin a more lifelike appearance.
Final Remarks
Creating a 3D hippo model, from the hippo skull to the final textures, requires a careful combination of anatomy knowledge, technical skills, and artistic intuition. By following a structured approach—starting with solid reference materials, simulating muscles realistically, and ensuring the right lighting and shading—you can achieve a highly detailed, lifelike model.
The process is both challenging and rewarding, allowing you to develop a deeper understanding of anatomy and improve your overall 3D modeling skills. Whether you’re a beginner or an experienced artist, mastering these techniques will elevate your 3D creations and prepare you for even more complex projects in the future.
Frequently Asked Questions (FAQs)
1. Why is muscle simulation important in 3D modeling?
Muscle simulation adds realism to character movements by accurately replicating the jiggle and deformation of muscles beneath the skin. It enhances the believability of animations, especially in creatures like hippos, where the movement of muscles significantly impacts the overall animation.
2. What tools are best for muscle simulation in 3D models?
Ziva Dynamics is one of the best tools for muscle simulation, offering realistic muscle deformations. It allows for the creation of jiggle effects, which is ideal for lifelike models such as a hippo. However, alternatives like Andy van Straten’s simplified setup also work well for more straightforward simulations.
3. How do you texture a 3D hippo model?
Texturing involves mapping detailed surface information onto the model. For the hippo, I used Mari and Substance 3D Painter to create realistic textures. This process included using displacement maps, baking utility maps, and adjusting the shading to enhance realism.
4. What role does the hippo skull play in the model?
The hippo skull serves as the foundation for sculpting the entire model. By accurately shaping the skull and other bones, you can set anatomical landmarks, ensuring that the overall model remains realistic, especially in terms of muscle placement and movement.
5. Why is lighting important in the final presentation of a 3D model?
Lighting is crucial for bringing out the details in your model, such as the textures and the muscle definition. A well-set-up lighting system ensures that the model looks realistic and visually appealing, showcasing the hard work put into the texturing and sculpting process.
For more information visit sumosearchs.